- The Pain-Free Positioning Zones on Your Head
- Positions to Avoid (High-Tension Areas)
- Step-by-Step: The Low-Nape Technique
- Step-by-Step: The Side-Positioned Style
- Rotation Schedules for Daily Wear
- Mapping Your Personal Sensitive Zones
- Troubleshooting Position Problems
- Position Tips for Specific Situations
- FAQ
- Related Articles
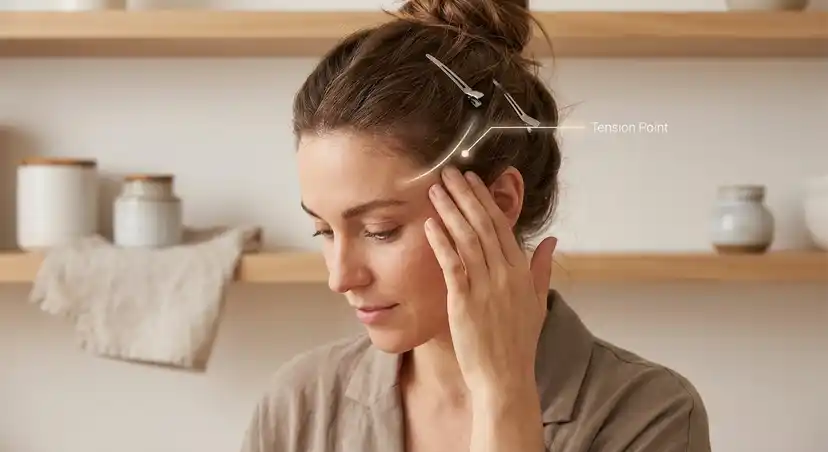
The same clip that gives you headaches might be perfectly comfortable—if positioned differently.
Most styling-related headaches aren't caused by the clip itself but by where it's placed. Position a clip over a sensitive nerve pathway and you get pain. Position it in a cushioned, nerve-sparse area and you get comfort.
This guide maps your scalp's pain-free zones, teaches positioning techniques that prevent headaches, and provides a rotation schedule for daily wear.
For complete headache prevention, see our complete guide to pain-free hair styling.
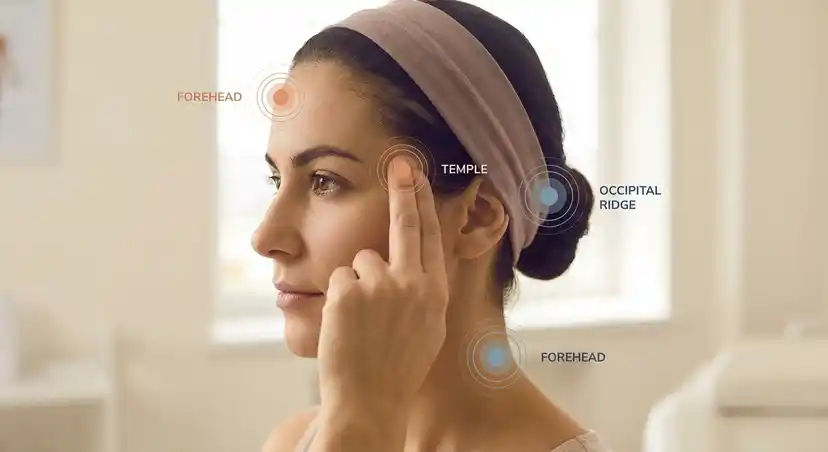
The Pain-Free Positioning Zones on Your Head
Your scalp isn't uniformly sensitive. Some areas tolerate pressure well; others don't. Understanding this map helps you position clips strategically.
Zone 1: Lower Nape (Most Comfortable)
Location: The back of your neck where it meets your head, below the occipital bone (the bump at the back of your skull).
Why it's comfortable:
- Thick muscle tissue provides natural cushioning
- Fewer superficial nerve endings
- Gravity supports styles here (less tension needed)
- Naturally padded by neck muscles
Best for:
- All-day wear
- Sensitive scalps
- Those prone to headaches
- Work and professional settings
How to find it: Run your fingers down the back of your head. Where the skull curves inward before your neck begins—that's the lower nape zone.
Zone 2: Behind the Ears (Low)
Location: The area behind your earlobes, between ear and lower nape.
Why it's comfortable:
- Natural tissue padding
- Away from major nerve pathways
- Good for side-positioned styles
- Clip doesn't press against headrests
Best for:
- Side-swept styles
- Half-up looks
- Avoiding center-back pressure
- Rotation variety
How to find it: Place your fingers directly behind your earlobes, about one inch toward the back of your head.
Zone 3: Mid-Back (Moderately Comfortable)
Location: Center back of head, about halfway between crown and nape.
Why it's variable:
- Comfort depends on individual anatomy
- Some people have more tissue padding here than others
- Can work well with the right clip design
Best for:
- Classic updo positioning
- When lower positions don't suit the style
- Those who find this zone comfortable
How to find it: Place your hand flat against the back of your head at ear level.
Zone 4: Crown/Top (Use with Caution)
Location: The top of your head, roughly where a yarmulke would sit.
Why it's risky:
- Less tissue padding over skull
- Nerves closer to surface
- Fighting gravity (requires tighter hold)
- Common site for compression headaches
Best for:
- Short-duration wear only
- Styles that specifically require high positioning
- Those who've tested and found comfort here
Avoid if: You're prone to headaches, have a sensitive scalp, or need all-day wear.
Positions to Avoid (High-Tension Areas)
These areas commonly cause problems:
The Temples
Location: Sides of forehead, between eye and ear.
Why to avoid:
- Superficial temporal artery runs here
- Auriculotemporal nerve is very close to surface
- Very thin tissue over bone
- Any pressure quickly becomes painful
Never position clips: Directly at or over the temples.
The Occipital Ridge
Location: The horizontal ridge where the back of your skull curves down to your neck.
Why to avoid:
- Greater and lesser occipital nerves exit here
- Pressure can trigger severe headaches radiating up the skull
- Very sensitive in most people
Instead: Position below this ridge, in the soft tissue of the lower nape.
High Crown Center
Location: The very top-center of your head.
Why to avoid:
- Minimal tissue padding
- Vertex of skull has less cushioning
- Often a "hot spot" for pressure pain
Instead: If you need high positioning, offset to one side rather than dead center.
Directly Over the Ears
Location: The area directly above your ears.
Why to avoid:
- Very thin skin
- Bone close to surface
- Sensitive nerve endings
- Even light pressure causes discomfort
Instead: Position clips behind rather than over ears.
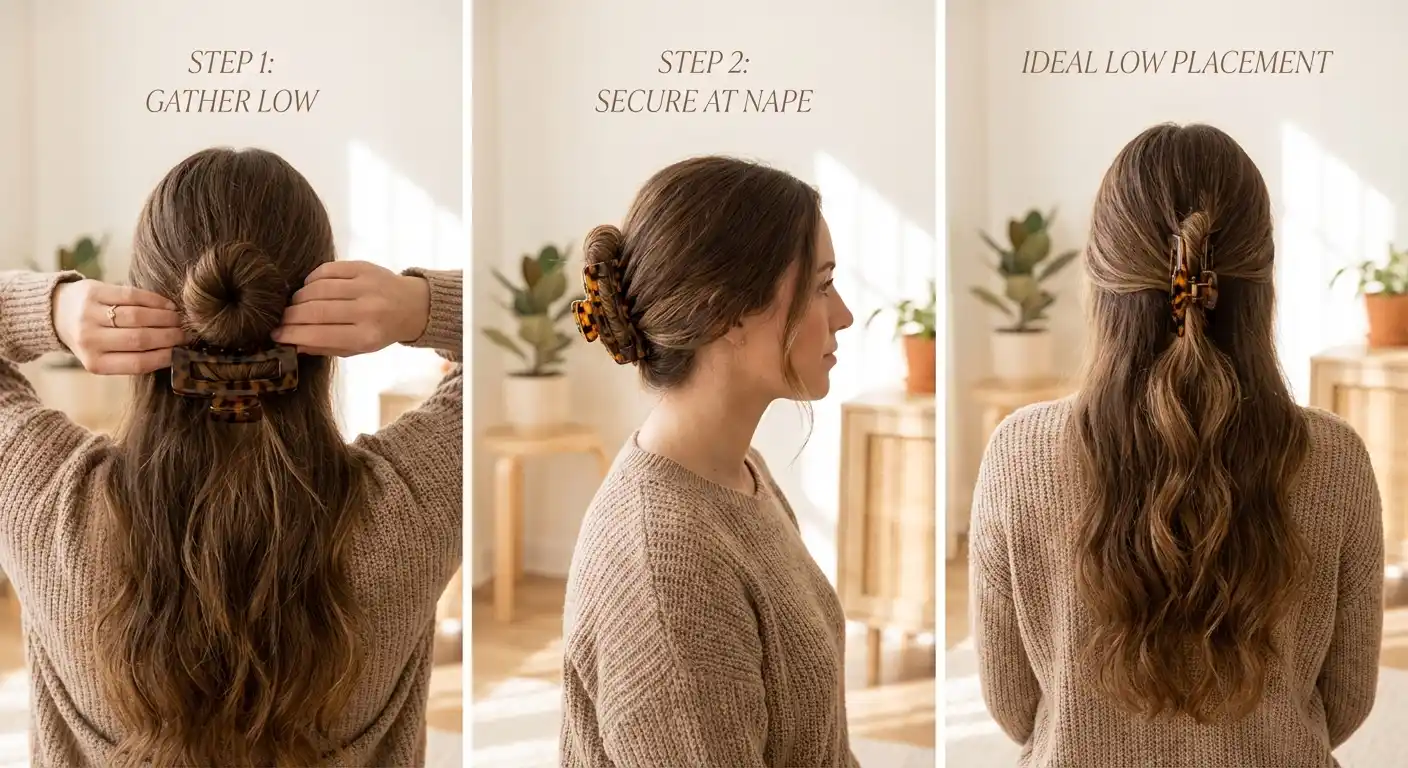
Step-by-Step: The Low-Nape Technique
The most reliably comfortable positioning method:
Step 1: Gather Loosely
- Collect all hair (or the portion you want up)
- Keep your grip loose—don't pull
- Hair should drape, not stretch
Step 2: Find the Sweet Spot
- Run your hand down the back of your head
- Stop where the skull curves inward above your neck
- This is your target zone
Step 3: Create a Gentle Twist
- Twist the gathered hair loosely
- Stop before it feels tight
- The twist should be relaxed, not wound
Step 4: Position the Clip
- Hold the twist against the nape zone
- Open the clip and position it horizontally
- The clip should catch the twist, not your scalp
Step 5: Secure Without Pressure
- Let the clip close on the hair
- It should grip the twist, not press into your head
- If you feel pressure on your scalp, reposition
Step 6: Check Comfort
- Does anything feel tight or pressing?
- Can you move your head freely?
- Would you forget you're wearing this in 10 minutes?
If you answered yes, you've achieved proper positioning.
Step-by-Step: The Side-Positioned Style
For variety and to avoid center-back fatigue:
Step 1: Choose a Side
- Decide whether you're positioning left or right
- Alternate daily for rotation benefits
Step 2: Gather Hair to That Side
- Collect hair and let it fall toward the chosen side
- Don't twist across the back—let it flow naturally sideways
Step 3: Find the Position Behind the Ear
- Locate the soft area behind and below your earlobe
- This is your target zone—cushioned and nerve-sparse
Step 4: Twist Gently Downward
- Create a loose downward twist
- The twist direction should follow the natural fall
Step 5: Clip Horizontally or at Angle
- Position clip to catch the twist
- Angle can be horizontal or follow the twist direction
- Avoid vertical positioning that may pull
Step 6: Confirm Comfort
- The clip should feel secure but not pressing
- No pulling sensation at the scalp
- Comfortable enough to forget
Rotation Schedules for Daily Wear
Never wear a clip in the exact same position two days in a row. Here are rotation schedules:
Basic 5-Day Rotation
| Day | Position | Height |
|---|---|---|
| Monday | Center back | Low nape |
| Tuesday | Right side | Behind ear |
| Wednesday | Center back | Mid-back |
| Thursday | Left side | Behind ear |
| Friday | Center back | Low nape |
Advanced 7-Day Rotation
| Day | Position | Notes |
|---|---|---|
| Monday | Center nape | Lowest position |
| Tuesday | Right side low | Behind right ear |
| Wednesday | Center mid | Halfway up back |
| Thursday | Left side low | Behind left ear |
| Friday | Center nape | Return to lowest |
| Saturday | Varied | Try a different style |
| Sunday | Rest day | Hair down all day |
Sensitive Scalp Rotation
For those prone to headaches—maximize comfort:
| Day | Position |
|---|---|
| Every day | Nape zone only |
| Alternate | Center nape vs. slightly left/right of center |
| Weekly | At least 2 days with hair down |
The key is preventing any single area from bearing repeated, consecutive pressure.
Mapping Your Personal Sensitive Zones
Everyone's nerve patterns vary. Here's how to find your specific sensitivities:
The Pressure Test
-
With hair down, use your fingertip to apply light pressure at various scalp points
-
Hold pressure for 10-15 seconds at each spot
-
Note any spots that feel:
- Immediately uncomfortable
- Tender or sensitive
- Like a "not there" spot you instinctively avoid
-
These are your personal avoid zones
The Clip Test
- Wear a clip in a specific position for 30 minutes
- Note any developing discomfort
- Repeat at different positions over several days
- Build a mental map of comfortable vs. uncomfortable zones
Document Your Map
After testing, you should know:
- Your most comfortable positions (your go-to zones)
- Positions that work sometimes but not always
- Positions to absolutely avoid
This personal map is more valuable than general guidelines.
Troubleshooting Position Problems
"I can't find a comfortable position"
Try:
- Lower than you think necessary
- Multiple small clips instead of one large clip
- Flat-back clip designs that don't create pressure points
- Loose half-up styles rather than full updos
The TELETIES Flat Round Clip works comfortably in almost any position thanks to its completely flat profile.
"My comfortable position doesn't look good"
Solutions:
- Lower styles are currently fashionable—embrace them
- Add decorative clips at comfortable positions
- Accept that comfort trumps aesthetics for daily wear
- Save uncomfortable positions for brief special occasions
"The clip slips out of comfortable positions"
Solutions:
- Use a clip with stronger spring
- Add texturizing spray before styling
- Choose a clip designed for your hair type
- Try a clip with matte finish for better grip
See why does my claw clip keep falling out for more solutions.
"I have no comfortable positions"
This suggests:
- Very sensitive scalp overall
- Possible underlying scalp condition
- Need for gentler clip designs
Try:
- Flat-back clips exclusively
- Ultra-lightweight mini clips
- Very loose styling with minimal tension
- Consulting a dermatologist if sensitivity is extreme
For ultra-sensitive scalps, Mini Matte Jaw Clips create virtually no pressure and work in almost any position.
See our guide to best claw clips for sensitive scalps.
Position Tips for Specific Situations
For Driving
Lower nape position keeps clip away from headrest. Flat-back clips essential if any reclining against seat.
See: best flat claw clips for driving and reclining.
For Office Work
Low positions comfortable for chair backs. Side positions offer variety without visibility issues. Rotate throughout the week.
For Exercise
Very low or flat-back required. Nothing that shifts with movement. Position where clip won't catch on equipment.
See: best claw clips for the gym.
For Sleep
Avoid clips entirely if possible. If needed, very low nape position only. Remove if any discomfort.
See: how to sleep with a claw clip.
For All-Day Wear
Prioritize lowest comfortable position. Plan for repositioning breaks. Choose flat-back or lightweight clips.
See: best claw clips for all-day comfort.
FAQ
Does clip position really matter that much?
Yes—often more than the clip itself. The same clip that causes headaches at the crown may be comfortable at the nape. Position determines whether the clip compresses sensitive nerves or sits in a cushioned zone.
Why is lower always better?
Lower positions offer: more tissue padding, fewer superficial nerves, gravity supporting the style (less tension), and no pressure against headrests. Higher positions fight gravity and often sit over more sensitive areas.
Can I ever wear clips high?
Yes, but with caveats: use the gentlest possible clips, style very loosely, limit duration, and avoid if prone to headaches. High positioning works better for some people than others—test carefully.
How often should I rotate positions?
Ideally, never wear a clip in the exact same position two consecutive days. Daily rotation prevents cumulative nerve irritation at any single spot.
What if my hair type limits positioning options?
Work with what you have. If your hair only styles well at certain positions, focus on: using the gentlest clips possible at those positions, taking more frequent breaks, and incorporating more hair-down days.
Related Articles
- The Complete Guide to Pain-Free Hair Styling
- Why Do Hair Clips Give Me Headaches?
- External Compression Headaches from Hair Clips
- Scalp Pain After Wearing Hair Clips
- Best Claw Clips for Sensitive Scalps
- Best Claw Clips for All-Day Comfort
- Best Flat Claw Clips for Driving and Reclining
- How to Reduce Tension from Hair Clips
- Why Does My Claw Clip Keep Falling Out
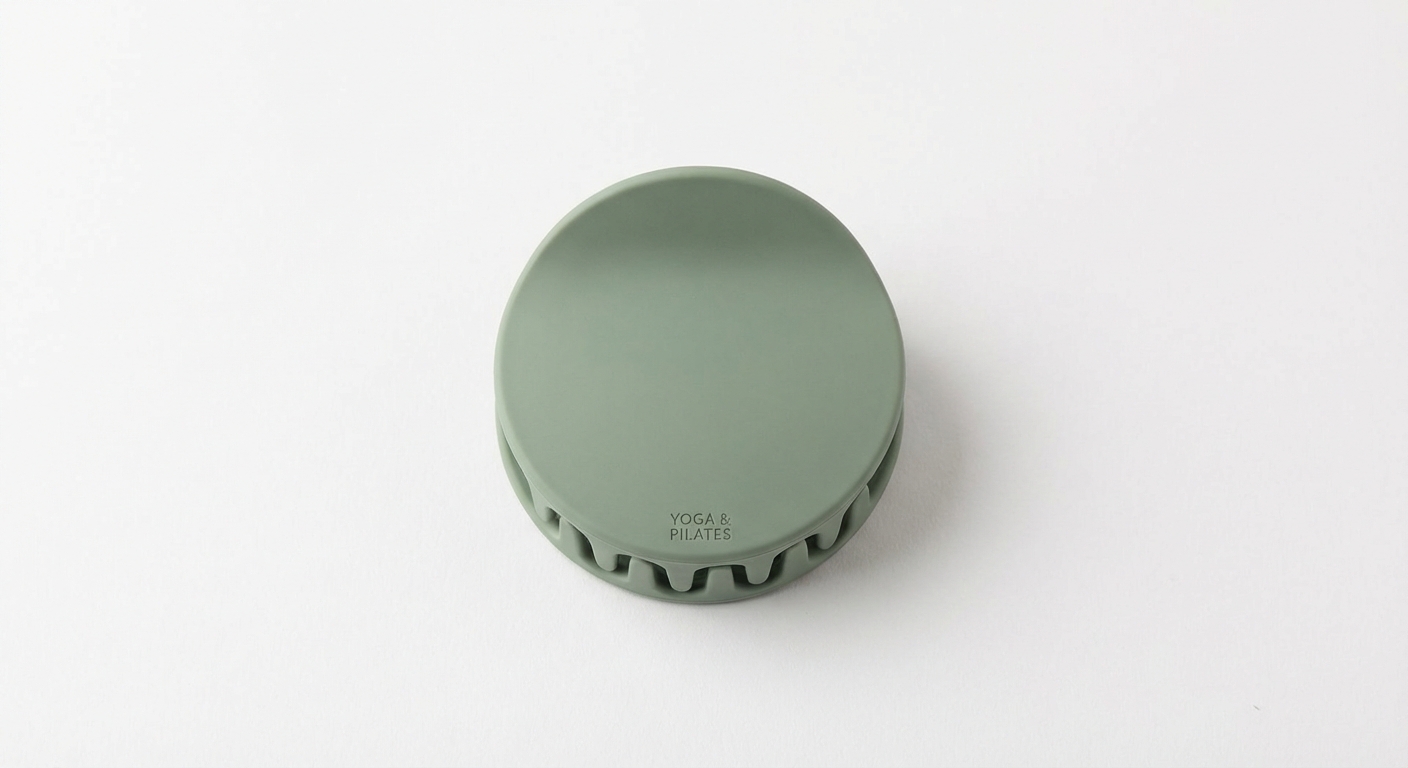
TELETIES Medium Flat Round Clip
The flat back makes this clip comfortable in almost any position—even when reclining. Doesn't create a pressure point regardless of where you place it.
“Can wear it anywhere on my head without discomfort. The flat design is key....”
We tested dozens of claw clips to find the very best options. Below you'll find our complete ranking, with detailed reviews and real customer feedback for each pick.
The Complete Ranking
TELETIES Medium Flat Round Clip
“Can wear it anywhere on my head without discomfort. The flat...” — Verified Buyer
The flat back makes this clip comfortable in almost any position—even when reclining. Doesn't create a pressure point regardless of where you place it.
“Can wear it anywhere on my head without discomfort. The flat design is key.”
— Verified Buyer

TOCESS Large Claw Clips (8 Pack)
“Works great at any height. Wide teeth feel much gentler than...” — Verified Buyer
Wide teeth distribute grip so the clip doesn't dig in regardless of position. Large enough to hold hair securely at lower, more comfortable positions.
“Works great at any height. Wide teeth feel much gentler than narrow ones.”
— Verified Buyer
Can wear it anywhere on my head without discomfort. The flat design is key.
Quick Comparison
A side-by-side look at our top picks
Frequently Asked Questions
Position is half the battle
Your sensitive spots are unique
Rotation prevents accumulation

Donna Miller
Enjoyed This Guide?
Get more hair tips and product recommendations delivered weekly.